1. Introduction
HHave you ever struggled with shoelaces that are too long and keep getting tangled? Long round shoelaces not only look messy but can also be unsafe because they may cause you to trip or get caught.
If you’ve been wondering how to shorten round shoelaces without fraying, you’re in the right place! In this simple guide, we’ll show you the best way to cut and seal your shoelace ends so they stay neat and don’t unravel.
To get started, you’ll need a few basic tools: sharp scissors, a lighter or candle, some clear tape, and optionally, heat-shrink tubing or superglue for a professional finish. This process only takes about 10-15 minutes but can save you money and keep your laces looking fresh for a long time.
2. How to Shorten Round Shoelaces Without Fraying
Shortening round shoelaces might seem simple—but if not done properly, they can fray and become unusable. This guide explains why shoelaces fray and gives you step-by-step instructions to shorten them safely and neatly using everyday tools.
Why Do Shoelaces Fray When Cut?
Before cutting your laces, it’s helpful to understand how they’re made.
Round shoelaces usually have two parts:
- An outer woven layer that gives the lace its shape and look.
- An inner core (often made of synthetic fibers) that adds strength.
When you cut the lace, you break the weave. Without sealing the end, the fibers start to unravel. This is called fraying. Round laces tend to fray faster than flat ones because they are more tightly woven and press against each other more at the ends, increasing friction.
Tools You’ll Need
To shorten your round shoelaces neatly, gather the following:
- Scissors (sharp ones)
- Lighter or candle (for melting synthetic fibers)
- Heat-shrink tubing or clear nail polish
- Ruler or measuring tape
- Superglue or fabric glue (optional but helpful)
Steps to Shorten and Secure the Lace
1. Measure the Desired Length
- Wear your shoes and tie them.
- Decide how much shorter you want the laces.
- Mark the new length, leaving about 1 inch extra to work with.
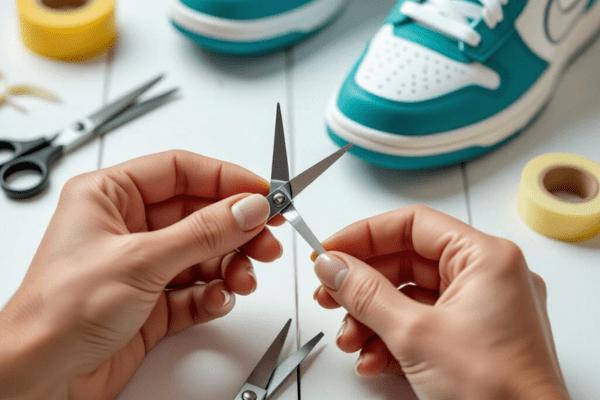
2. Cut the Shoelace
- Use sharp scissors to make a clean cut.
- Cut both laces at the same point for an even look.
3. Prevent Fraying (Choose One Method)
Method A: Use Heat to Seal
- Carefully use a lighter to melt the end of the shoelace.
- Roll the melted tip with a metal surface (like the side of scissors) to shape it like a factory-finished tip (called an aglet).
- Don’t overheat. Just enough to melt the synthetic fibers.
Method B: Use Nail Polish or Superglue
- Apply clear nail polish or superglue to the cut end.
- Let it dry completely.
- This seals the fibers and keeps the lace from unraveling.
Method C: Use Heat-Shrink Tubing
- Cut a small piece of clear heat-shrink tubing.
- Slide it over the lace end.
- Use a heat gun or lighter to shrink it snugly over the tip.
- This creates a strong, waterproof seal.
Tips for Success
- Use flame-resistant surfaces when working with heat.
- Avoid overheating—you just want to seal, not burn.
- For a clean, factory-style finish, try using heat-shrink tubing.
- Keep your laces taut when applying glue or heat for a better look.
- If using glue or polish, let it dry fully before using the laces again.
- Use acetone-free nail polish to avoid damaging the lace material.
Final Thoughts
By using these simple methods, you can easily shorten round shoelaces without fraying. Whether you prefer heat, glue, or tubing, the key is to seal the end properly. Not only will your shoelaces last longer, but they’ll also look neat and professional—just like new.
3. Tools You’ll Need
Before we start, collect these items to make the process easy and clean:
- Sharp scissors—for a clean, even cut
- Lighter or candle—to melt shoelace ends and seal them
- Clear tape or masking tape—to hold the fibers together before cutting
- Optional:
- Heat-shrink tubing—for a strong, professional finish
- Glue or superglue—to prevent fraying
- Needle and thread—to sew a mini aglet if preferred
Using the right tools ensures you trim round shoelaces without damage and protect the ends from coming apart later.
Steps to Shorten Round Shoelaces Without Fraying
1. Measure the Length You Want
- Wear your shoes and tie the laces as usual.
- Decide how much shorter you want them.
- Mark the spot using a pen or a small piece of tape. Leave about 1 inch extra for sealing.
2. Tape the Area You’ll Cut
- Wrap clear tape or masking tape tightly around the lace where you plan to cut.
- This holds the outer fibers together and prevents immediate fraying.
3. Cut the Shoelace
- Use sharp scissors to make a clean, straight cut through the taped section.
- Cutting with dull scissors can crush or fray the fibers.
4. Seal the Ends
Here are 3 easy ways to seal the lace ends:
A. Melt Shoelace Ends (Best for Synthetic Laces)
- Carefully run the lighter or candle flame near the cut end.
- As the synthetic material melts, it will form a small, sealed ball.
- Gently press the tip (using a metal surface or your fingers through cloth) to shape it.
- This step is crucial if you want to prevent fraying.
B. Use Glue or Nail Polish
- Apply a small drop of superglue or clear nail polish to the cut tip.
- Let it dry completely. This will harden and protect the end.
- Great for fabric or cotton laces where heat may not work.
C. Apply Heat-Shrink Tubing (For a Pro Look)
- Slide a small piece of clear heat-shrink tubing over the lace end.
- Heat it with a lighter or heat gun until it shrinks snugly around the lace.
- This gives a clean, factory-like finish that lasts longer.
Tips for Success
- Always measure twice, cut once. You can’t undo a shortcut!
- Make sure the lace is synthetic before melting. Cotton may burn instead of melt.
- Use flame-resistant surfaces when working with heat.
- If using glue or polish, allow time to dry fully before using the shoelaces.
- A small dab of superglue plus tubing gives extra strength.
Final Words
Now you know how to trim round shoelaces without damage and how to seal them properly to prevent fraying. Whether you prefer using heat, glue, or tubing, the key is in sealing the ends correctly.
So the next time your shoelaces are too long, don’t worry—just follow this guide and give them a fresh, neat finish!
4. Step-by-Step Guide: How to Shorten Round Shoelaces Without Fraying
If your shoelaces are too long and getting in the way, don’t just cut them! Without the right technique, they’ll start to fray, look messy, and eventually become useless. This guide will show you how to shorten round shoelaces without fraying, using simple tools and beginner-friendly methods.
You’ll also learn how to seal shoelace tips, the best ways to fix a shoelace aglet, and how different shoelace material types (like nylon, polyester, or cotton) react to heat and glue.
Tools You’ll Need
To get started, gather these tools:
- Sharp scissors
- Clear or masking tape
- Lighter or candle
- Optional:
- Heat-shrink tubing
- Superglue or fabric glue
- Needle & thread
Using the right materials ensures a smooth finish whether you’re fixing round vs. flat shoelaces.
Step-by-Step Instructions
Step 1: Measure and Mark the Desired Length
- Wear the shoes and lace them up as you normally would.
- Decide how much shorter you want your laces to be.
- Leave about 1 inch extra for sealing.
- Mark the spot with a pen or a piece of clear tape.
Tip: It’s always better to measure twice and cut once!
Step 2: Wrap Tape Around the Cut Point
- Wrap a small strip of tape tightly around the area you plan to cut.
- This keeps the fibers together during the cut and helps prevent fraying.
Step 3: Cut the Shoelace Cleanly
- Use sharp scissors to cut right in the middle of the taped area.
- A clean cut is important to avoid uneven ends or splitting.
Using dull scissors may crush the lace instead of cutting it cleanly.
Step 4: Seal the Ends to Prevent Fraying
You can now seal shoelace tips using one of the following methods:
Option A: Use a Lighter
- Gently run the end of the shoelace through a lighter flame.
- The synthetic fibers (like nylon or polyester) will melt and fuse together.
- Once melted, roll the tip with a smooth metal surface to shape it.
Best for synthetic materials. Not ideal for cotton laces, as they may burn.
Option B: Use Heat-Shrink Tubing
- Cut a small piece of heat-shrink tubing (around 1 inch).
- Slide it over the cut end of the lace.
- Use a lighter or heat gun to shrink the tubing until it fits snugly.
Gives a clean, professional finish, especially great for dress shoes.
Option C: Apply Superglue or Fabric Glue
- Apply a small drop of superglue or clear nail polish to the tip.
- Let it dry fully before using.
- This hardens the end and prevents unraveling.
This is a simple method for shoelace aglet repair at home.
Option: D: Stitch the End
- Use thread to tightly wrap around the lace tip.
- Apply a drop of glue over the thread to seal it.
- This is a DIY version of creating a new aglet (the plastic tip at the end of laces).
Ideal for cotton or fabric laces where heat can damage the material.
Shoelace Material Types Matter
Different shoelace material types react differently when shortening:
| Material | Can Use Heat? | Recommended Method |
|---|---|---|
| Nylon | ✅ Yes | Melt or heat-shrink tubing |
| Polyester | ✅ Yes | Melt or glue |
| Cotton | ❌ No | Glue or stitching |
Have you ever struggled with shoelaces that are too long and keep getting tangled? In addition to their messy appearance, long round shoelaces pose a risk of tripping or snagging.
If you’ve been wondering how to shorten round shoelaces without fraying, you’re in the right place! In this simple guide, we’ll show you the best way to cut and seal your shoelace ends so they stay neat and don’t unravel.
To get started, you’ll need a few basic tools: sharp scissors, a lighter or candle, some clear tape, and optionally, heat-shrink tubing or superglue for a professional finish. This process only takes about 10-15 minutes but can save you money and keep your laces looking fresh for a long time.
2. How to Shorten Round Shoelaces Without Fraying
Shortening round shoelaces might seem simple—but if not done properly, they can fray and become unusable. This guide explains why shoelaces fray and gives you step-by-step instructions to shorten them safely and neatly using everyday tools.
Why Do Shoelaces Fray When Cut?
Before cutting your laces, it’s helpful to understand how they’re made.
Round shoelaces usually have two parts:
- An outer woven layer provides the lace with its shape and appearance.
- An inner core (often made of synthetic fibers) that adds strength.
When you cut the lace, you break the weave. Without sealing the end, the fibers start to unravel. This is called fraying. Round laces tend to fray faster than flat ones because they are more tightly woven and press against each other more at the ends, increasing friction.
Tools You’ll Need
To shorten your round shoelaces neatly, gather the following:
- Scissors (sharp ones)
- Lighter or candle (for melting synthetic fibers)
- Heat-shrink tubing or clear nail polish
- Ruler or measuring tape
- Superglue or fabric glue (optional but helpful)
Steps to Shorten and Secure the Lace
1. Measure the Desired Length
- Wear your shoes and tie them.
- Decide how much shorter you want the laces.
- Mark the new length, leaving about 1 inch extra to work with.
2. Cut the Shoelace
- Use sharp scissors to make a clean cut.
- Cut both laces at the same point for an even look.
3. Prevent Fraying (Choose One Method)
🔥 Method A: Use Heat to Seal
- Carefully use a lighter to melt the end of the shoelace.
- Roll the melted tip with a metal surface (like the side of scissors) to shape it like a factory-finished tip (called an aglet).
- Don’t overheat. Just enough to melt the synthetic fibers.
🧴 Method B: Use Nail Polish or Superglue
- Apply clear nail polish or superglue to the cut end.
- Let it dry completely.
- This seals the fibers and keeps the lace from unraveling.
🧪 Method C: Use Heat-Shrink Tubing
- Cut a small piece of clear heat-shrink tubing.
- Slide it over the lace end.
- Use a heat gun or lighter to shrink it snugly over the tip.
- This creates a strong, waterproof seal.
Tips for Success
- Use flame-resistant surfaces when working with heat.
- Avoid overheating—you just want to seal, not burn.
- For a clean, factory-style finish, try using heat-shrink tubing.
- Keep your laces taut when applying glue or heat for a better look.
- If using glue or polish, let it dry fully before using the laces again.
- Use acetone-free nail polish to avoid damaging the lace material.
Final Thoughts
By using these simple methods, you can easily shorten round shoelaces without fraying. Whether you prefer heat, glue, or tubing, the key is to seal the end properly. Not only will your shoelaces last longer, but they’ll also look neat and professional—just like new.
3. Tools You’ll Need
Before we start, collect these items to make the process easy and clean:
- Sharp scissors—for a clean, even cut
- Lighter or candle—to melt shoelace ends and seal them
- Clear tape or masking tape—to hold the fibers together before cutting
- Optional:
- Heat-shrink tubing—for a strong, professional finish
- Glue or superglue—to prevent fraying
- Needle and thread—to sew a mini aglet if preferred
Using the right tools ensures you trim round shoelaces without damage and protect the ends from coming apart later.
Steps to Shorten Round Shoelaces Without Fraying
1. Measure the Length You Want
- Wear your shoes and tie the laces as usual.
- Decide how much shorter you want them.
- Mark the spot using a pen or a small piece of tape. Leave about 1 inch extra for sealing.
2. Tape the Area You’ll Cut
- Wrap clear tape or masking tape tightly around the lace where you plan to cut.
- This holds the outer fibers together and prevents immediate fraying.
3. Cut the Shoelace
- Use sharp scissors to make a clean, straight cut through the taped section.
- Cutting with dull scissors can crush or fray the fibers.
4. Seal the Ends
Here are 3 easy ways to seal the lace ends:
A. Melt Shoelace Ends (Best for Synthetic Laces)
- Carefully run the lighter or candle flame near the cut end.
- As the synthetic material melts, it will form a small, sealed ball.
- Gently press the tip (using a metal surface or your fingers through cloth) to shape it.
- This step is crucial if you want to prevent fraying.
B. Use Glue or Nail Polish
- Apply a small drop of superglue or clear nail polish to the cut tip.
- Let it dry completely. This will harden and protect the end.
- Great for fabric or cotton laces where heat may not work.
C. Apply Heat-Shrink Tubing (For a Pro Look)
- Slide a small piece of clear heat-shrink tubing over the lace end.
- Heat it with a lighter or heat gun until it shrinks snugly around the lace.
- This gives a clean, factory-like finish that lasts longer.
Tips for Success
- Always measure twice, cut once. You can’t undo a shortcut!
- Make sure the lace is synthetic before melting. Cotton may burn instead of melt.
- Use flame-resistant surfaces when working with heat.
- If using glue or polish, allow time to dry fully before using the shoelaces.
- A small dab of superglue plus tubing gives extra strength.
Final Words
Now you know how to trim round shoelaces without damage and how to seal them properly to prevent fraying. Whether you prefer using heat, glue, or tubing, the key is in sealing the ends correctly.
So the next time your shoelaces are too long, don’t worry—just follow this guide and give them a fresh, neat finish!
4. Step-by-Step Guide: How to Shorten Round Shoelaces Without Fraying
If your shoelaces are too long and getting in the way, don’t just cut them! Without the right technique, they’ll start to fray, look messy, and eventually become useless. This guide will show you how to shorten round shoelaces without fraying, using simple tools and beginner-friendly methods.
You’ll also learn how to seal shoelace tips, the best ways to fix a shoelace aglet, and how different shoelace material types (like nylon, polyester, or cotton) react to heat and glue.
Tools You’ll Need
To get started, gather these tools:
- Sharp scissors
- Clear or masking tape
- Lighter or candle
- Optional:
- Heat-shrink tubing
- Superglue or fabric glue
- Needle & thread
Using the right materials ensures a smooth finish whether you’re fixing round vs. flat shoelaces.
Step-by-Step Instructions
Step 1: Measure and Mark the Desired Length
- Wear the shoes and lace them up as you normally would.
- Decide how much shorter you want your laces to be.
- Leave about 1 inch extra for sealing.
- Mark the spot with a pen or a piece of clear tape.
Tip: It’s always better to measure twice and cut once!
Step 2: Wrap Tape Around the Cut Point
- Wrap a small strip of tape tightly around the area you plan to cut.
- This keeps the fibers together during the cut and helps prevent fraying.
Step 3: Cut the Shoelace Cleanly
- Use sharp scissors to cut right in the middle of the taped area.
- A clean cut is important to avoid uneven ends or splitting.
Using dull scissors may crush the lace instead of cutting it cleanly.
Step 4: Seal the Ends to Prevent Fraying
You can now seal shoelace tips using one of the following methods:
Option A: Use a Lighter
- Gently run the end of the shoelace through a lighter flame.
- The synthetic fibers (like nylon or polyester) will melt and fuse together.
- Once melted, roll the tip with a smooth metal surface to shape it.
Best for synthetic materials. Not ideal for cotton laces, as they may burn.
Option B: Use Heat-Shrink Tubing
- Cut a small piece of heat-shrink tubing (around 1 inch).
- Slide it over the cut end of the lace.
- Use a lighter or heat gun to shrink the tubing until it fits snugly.
Gives a clean, professional finish, especially great for dress shoes.
Option C: Apply Superglue or Fabric Glue
- Apply a small drop of superglue or clear nail polish to the tip.
- Let it dry fully before using.
- This hardens the end and prevents unraveling.
This is a simple method for shoelace aglet repair at home.
Option: D: Stitch the End
- Use thread to tightly wrap around the lace tip.
- Apply a drop of glue over the thread to seal it.
- This is a DIY version of creating a new aglet (the plastic tip at the end of laces).
Ideal for cotton or fabric laces where heat can damage the material.
Shoelace Material Types Matter
Different shoelace material types react differently when shortening:
| Item | Where to Buy | Notes |
|---|---|---|
| Aglets replacement kits | Amazon, eBay, Shoelace specialty stores | Usually include metal/plastic aglets and mini tools |
| Heat-shrink tubing | Hardware stores, Online (Amazon) | Get tubing that fits snugly over your lace tips |
| Fabric glue / Superglue | Any stationery or craft store | For sealing cotton or soft laces |
| Clear nail polish | Beauty stores, general supermarkets | Great as a quick sealing option |
Replacing or customizing aglets is a smart way to upgrade your laces, especially for dress shoes, sneakers, or even boots.
Final Thoughts
To shorten shoelaces neatly, the real secret is attention to detail. Whether you’re doing a quick fix or aiming for a premium look:
- Always seal the cut end (no matter the method).
- Choose sealing techniques based on your shoelace material type (cotton, nylon, or polyester).
- And if you want to go one step further—match or replace the aglet with tools that are easy to find and use.
Now that you know how to cut and seal shoelace tips, there’s no need to struggle with extra-long or frayed laces again. Keep your shoes looking clean, neat, and fully customized!
6. When Should You Just Replace Your Shoelaces Instead?
Sometimes, no matter how carefully you try to fix or shorten them, shoelaces are just too far gone. If you’re wondering whether to trim or toss them, this guide will help you decide. We’ll also cover a few key points about shoelace maintenance, cord cutting tools, and how to cut round laces cleanly—if you still decide to modify them.
Signs It’s Time to Replace Your Shoelaces
Before you reach for scissors or glue, check for these signs. If your laces have any of the following issues, it may be better to replace them instead of trying to repair them:
1. Worn-Out Laces
- Frayed all along the length, not just at the ends.
- Faded color that no longer matches your shoes.
- The lace has become too thin or soft from wear and tear.
Worn-out laces lose grip and tension, causing shoes to untie more often.
2. Damaged Structure
- Laces feel stretched out or irregular in shape.
- The inner core of round laces is exposed or broken.
- They’re stiff in some areas and too flexible in others.
These are signs that the lace’s original structure is gone. Sealing the ends won’t solve deeper damage inside.
3. You’ve Repaired Them Too Many Times
If you’ve already:
- Burned the ends more than once,
- Used superglue, nail polish, or heat-shrink tubing repeatedly,
- Or tied knots to stop fraying…
…then your laces are probably at the end of their lifespan.
Continuous fixes can affect comfort and even cause pressure points on your feet.
When to Modify vs. When to Replace
| Situation | Modify (Cut & Seal) | Replace |
|---|---|---|
| Slightly too long | ✅ Yes | ❌ No |
| One frayed end | ✅ Yes | ❌ No |
| Fully worn or stretched | ❌ No | ✅ Yes |
| Damaged aglet | ✅ Maybe | ✅ Maybe |
| Frayed along full length | ❌ No | ✅ Yes |
Not sure how to cut round laces cleanly? Use sharp cord-cutting tools like fabric scissors or thread snips, and seal immediately using heat, glue, or tubing.
Where to Get Good Replacement Shoelaces
If it’s time to buy new laces, consider these tips:
- Choose the right shoelace material (cotton, polyester, or nylon).
- Match the length and color to your shoe type.
- For a premium look, buy laces with metal or plastic aglets already attached.
Online and Offline Sources:
- Shoe stores (often offer exact brand replacements)
- Online marketplaces like Amazon, eBay, or specialty lace websites
- Some craft and sports stores carry heat-shrink tubing kits or aglet replacement packs.
Pro tip: Replacing laces is part of smart shoelace maintenance, just like polishing shoes or changing insoles.
Final Thought
You’ve learned all about how to cut round laces cleanly and how to shorten shoelaces without fraying. But sometimes, the best option is to start fresh. New shoelaces can improve the look, fit, and comfort of your shoes—and they don’t cost much.
So, the next time your laces look tired or break too often, ask yourself:
Is it time to fix them or just replace them? Choose the option that keeps you comfortable and your shoes looking great.
7. Conclusion
Shortening round shoelaces is simple if done right. Just measure, cut with sharp scissors, and seal the ends using a lighter, glue, or heat-shrink tubing. This prevents fraying and gives your laces a clean finish.
Instead of buying new laces every time, this DIY trick saves money and extends lace life—a smart part of shoelace maintenance.
👉 Try it today and enjoy a secure, tangle-free fit.
Learn how to shorten round shoelaces without fraying and keep your shoes looking fresh!
FAQs
1. Can I use nail polish to seal shoelaces?
Yes, you can use clear nail polish to seal the cut ends of shoelaces. It helps stop fraying by hardening the fibers. Just apply a small amount on the lace tip and let it dry completely. However, for a stronger and longer-lasting seal, you might prefer using superglue or heat-shrink tubing.
2. Is this method safe for kids’ shoes?
Absolutely! When shortening and sealing shoelaces for kids, use caution, especially with heat sources like a lighter or candle. If you’re worried about safety, stick to non-heat options like nail polish or fabric glue. Always supervise children during the process to prevent accidents.
3. How long will the sealed lace last?
When sealed properly using methods like melting the ends, applying glue, or using heat-shrink tubing, shoelaces can last for months or even years without fraying. The lifespan depends on the shoelace material (e.g., nylon or cotton), shoe use, and how well the seal is applied.
4. Can I shorten any type of shoelace this way?
Mostly yes! This method works best on round synthetic laces like nylon or polyester because their fibers melt and seal nicely. For cotton or flat laces, melting won’t work; instead, use glue or stitching to prevent fraying.
5. What tools do I need to shorten round shoelaces without fraying?
You’ll need:
Sharp scissors for a clean cut
A lighter or candle (for melting synthetic laces)
Tape to hold the lace before cutting
Optional: Heat-shrink tubing, superglue, or needle & thread to seal the ends
These tools help you safely and neatly shorten shoelaces without damage.