1.Introduction
Frayed shoelace tips are a common problem—especially after regular wear, washing, or exposure to heat. Once the plastic tip—known as an aglet—comes off, the shoelace starts to fray, making it difficult to lace up your shoes and leaving them looking untidy.
But instead of throwing the laces away, there’s a quick and effective solution you can try at home. In this guide, you’ll learn how to fix frayed laces with a straw, using nothing more than a plastic straw, scissors, and a lighter. This easy DIY method not only saves your laces but also helps your shoes look neat and clean again.
Whether you’re fixing round or flat laces, this technique is beginner-friendly and takes just a few minutes to do..
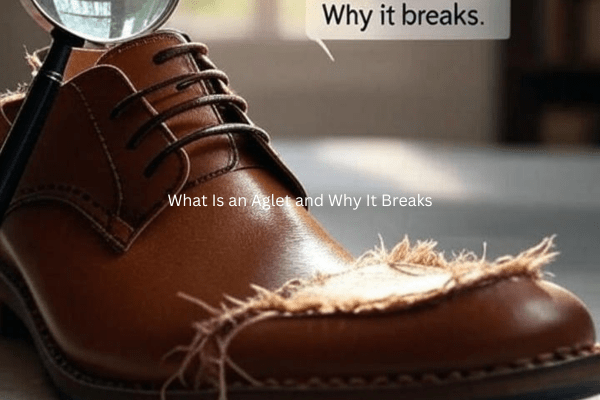
2. What Is an Aglet and Why It Breaks
An aglet is the small plastic or metal tip found at the ends of your shoelaces. Though it looks like a minor detail, this tiny piece plays an important role—it prevents your laces from fraying and helps you easily insert them through the eyelets of your shoes.
Without an aglet, even tying your shoes can become a hassle.
Why Do Aglets Break?
Aglets often get damaged from:
- Daily wear and tear
- Repeated washing
- Moisture and dirt buildup
- High heat (like direct sunlight or dryer use)
Once the aglet wears out or falls off, the lace starts to fray. The fibers separate, making it hard to push through shoe holes or tie a clean knot.
This is when many people start searching for how to repair shoelace tips without buying new laces.
Problems When an Aglet Is Missing
A missing aglet may seem like a small issue, but it can lead to:
- Difficulty threading the lace through shoe holes
- Fast fraying and weakening of the lace ends
- A messy, worn-out look
- Needing to replace otherwise good shoelaces
Instead of tossing out your laces, consider quick and affordable fixes. Many DIYers learn how to repair shoelace tips at home using tape, glue, or even a plastic straw—a simple trick that actually works.mple materials like tape, glue, or even a plastic straw.
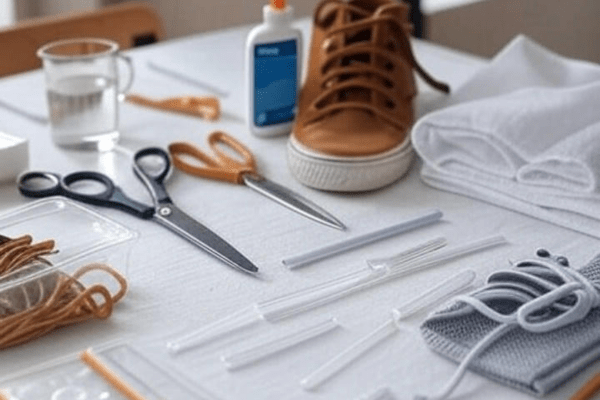
3.What You’ll Need (Simple Supplies List)
Before starting, get all the tools ready. These basic items will help you make new aglets (shoelace tips) using a straw. This step-by-step DIY guide to making aglets is easy, fast, and doesn’t cost much.
Here’s What You Need:
1. Plastic Straw
Pick a thin, firm straw. Try to choose a color that matches your shoelaces. This straw will become the new shoelace tip (aglet).
Tip: A strong straw works best—it won’t bend or fall apart easily. It’s one of the best tools for repairing shoelaces at home.
2. Scissors
Use scissors to cut a small piece of the straw. A piece measuring around 1 to 1.5 inches works best when making a new aglet.
3. Lighter or Matchstick
You’ll need to apply mild heat to soften and tighten the straw around the lace, creating a secure seal.Be very careful—this step is important because it helps the straw grip tightly and stops the lace from fraying again.
Safety Tip: Always be cautious when using fire. Keep it away from children and flammable items.
4. (Optional) Glue
A drop of glue inside the straw can help hold the lace even better.
5. (Optional) Tweezers
Tweezers can help you slide the lace into the straw more easily.
Bonus Tip:
Want to know how to prevent shoelaces from fraying in the future? This straw method is a great DIY option. But if you prefer long-term durability, you can also buy metal or plastic aglet caps online. Each method has its own pros and cons of DIY vs buying replacement laces.
Choosing the right material—like strong straws or metal caps—makes a big difference when learning how to choose the right aglet material.
4. Step-by-Step Guide – Easy Shoelace Fix Using Straw and Lighter
Got a frayed or broken shoelace tip? Don’t throw your laces away! Instead, try this smart and cheap way to fix shoelaces at home using a plastic straw and a lighter. It’s quick, easy, and actually works!
Follow this straw trick for shoelaces in just five simple steps:
Step 1 – Trim the Frayed Lace End
Use sharp scissors to cut off the damaged or frayed part of the lace.
Make sure the cut is clean and straight.
This helps your new DIY aglet (lace tip) fit better and look neater.
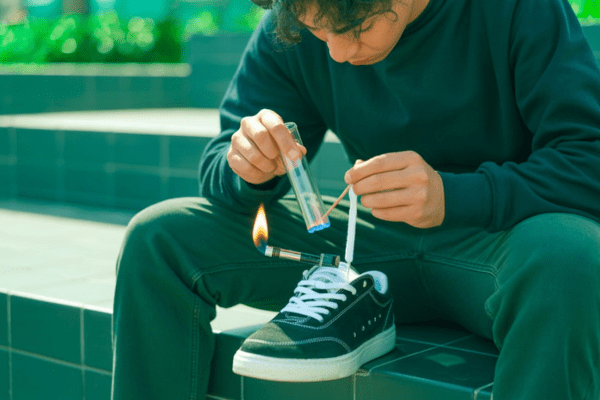
Step 2 – Cut a 1-Inch Piece of Straw
Take a strong plastic straw and cut a piece about 1 inch long.
This piece will become the new tip of your shoelace.
Step 3 – Slide the Lace into the Straw
Push the trimmed end of the shoelace gently into the straw piece.
Make sure the lace sits snugly inside—this helps the straw stay in place when you heat it.
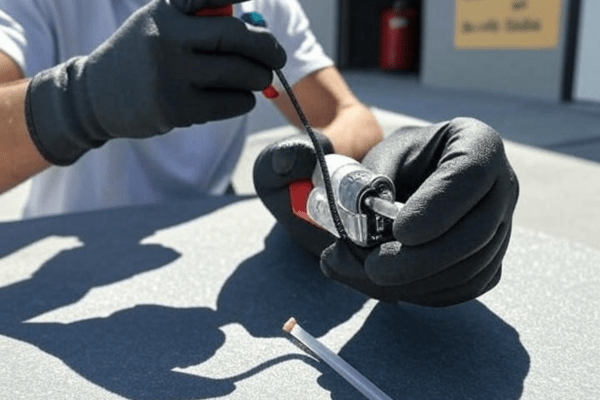
Step 4 – Seal with a Lighter (Carefully!)
Now it’s time for the shoelace fix with lighter and straw method!
Hold the straw over a flame (use a lighter or match) and gently rotate it so all sides melt evenly.
As it melts, the straw will shrink and wrap tightly around the lace, forming a solid new aglet.
Important:
Be extra careful with heat. Don’t touch the hot plastic and never hold the straw too close to the flame. Keep your fingers safe.
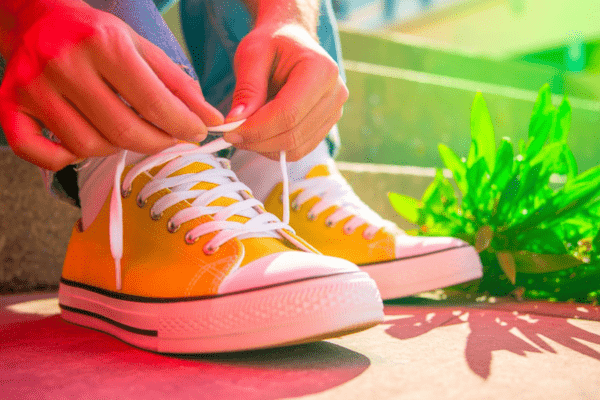
Step 5 – Let It Cool and Test It Out
Let the lace cool for a few minutes. Once it’s hard and smooth, test it by inserting it into your shoe’s eyelet.
If it slides in easily—you did it! You’ve created a strong new lace tip at home, all thanks to this straw trick for shoelaces.
Final Tip:
This method is a cheap way to fix shoelaces and works best for everyday sneakers, school shoes, or sports laces. With just a straw and a bit of heat, your shoelaces can look and work like new!

5. Safety Tips for Using Heat
When you’re following the method of how to fix frayed laces with a straw, one of the most important steps involves using a lighter to melt the plastic. While it’s a simple and effective trick, it does involve heat—so safety is essential. Below are some detailed safety guidelines to help you do it safely and confidently.
Don’t Overheat the Straw
Be cautious while heating the straw—avoid applying too much heat to prevent damage.If you bring the flame too close or hold it for too long:
- The plastic can burn or catch fire, which is dangerous.
- Overheating can cause the plastic to melt unevenly or shrink too much, making it unusable.
- It may also release unpleasant or harmful fumes if burned.
Tip: Hold the flame at least 1–2 inches away and move it around slowly. You only want the straw to soften—not melt completely.
Always Work in a Ventilated Area
Even though you’re using a small piece of plastic, melting any plastic can produce fumes. The fumes might seem mild, but they can still be harmful to your lungs.
To protect yourself:
- Work near an open window or use a fan to circulate air.
- Never do this in a closed room without ventilation.
- Avoid inhaling any smoke or fumes directly.
Keep Children and Pets Away
If you have children or pets nearby, make sure they stay clear of your workspace. A lighter, even for a second, can be dangerous in the wrong hands.
- Keep all tools (lighter, scissors, hot plastic) out of reach.
- Do the project on a stable surface, like a desk or countertop.
- Avoid using your lap or bed as a workspace.
Use Tools to Hold the Lace
Handling a small lace and a lighter at the same time can be tricky. Instead of using your fingers:
- Grip the shoelace and straw securely using tweezers or small needle-nose pliers.
- This gives you more control over the flame and keeps your fingers safe from burns.
- You can also wear heat-resistant gloves if you’re more comfortable that way.
Have Water Nearby (Just in Case)
While the chance of an accident is low, it’s always better to be prepared. Keep a small bowl of water nearby just in case:
You need to quickly cool down a piece before touching it.ld the lace while applying heat. This keeps your hands safe and gives you better control during the melting process.
You overheat the straw and it starts to burn.
6.Optional – Other DIY Methods to Make Aglets
If you’ve already learned how to fix frayed laces with a straw, you know it’s one of the quickest and easiest solutions. But it’s not the only option. There are several other DIY methods you can use to repair or recreate aglets at home, each with its own level of durability, look, and ease.
Let’s explore the most popular ones:
1. Tape + Glue Method
This is a quick and simple method using everyday materials.
How to do it:
- Trim the frayed lace tip to make it neat.
- Take strong thread (like embroidery thread or polyester thread) and tightly wind it around the tip several times.
- Apply a small amount of super glue on the outer surface of the tape to harden it.
- Let it dry fully before using the lace.
Pros:
- Easily available materials (tape and glue)
- Takes only a couple of minutes
- No heat needed, safe for kids to try
Cons:
- Not very durable for heavy use
- May become sticky over time
- Doesn’t look very clean or professional
2. Thread + Glue Method
This is a neat and strong option if you want something more secure.
How to do it:
- Trim the lace tip.
- Take strong thread (like embroidery thread or polyester thread) and tightly wind it around the tip several times.
- Tie off the thread securely.
- Add a thin layer of fabric glue or super glue over the thread to seal it.
- Allow it to dry completely.
Pros:
- Long-lasting if done well
- Can be made to match lace color
- Clean and tight finish
Cons:
- Takes more time and patience
- Requires precision and a steady hand
- Slightly more effort than the straw method
3. Heat-Shrink Tubing Method
This is the most professional and durable option but may need materials you don’t already have at home.
How to do it:
- Buy small-diameter heat-shrink tubing from a hardware or electronics store.
- Cut a piece about 1 inch long.
- Slide it over the lace tip.
- Gently apply heat using a lighter or a heat gun with controlled movement
- The straw will contract snugly around the lace, creating a firm and durable new tip.
Pros:
- Very durable
- Clean, professional look
- Long-term solution
Cons:
- Requires special tubing and heat source
- Not ideal if you need a quick fix
- Extra cost if materials are not already available
7.How to Fix Frayed Laces with a Straw – The Easiest Method?
Now that we’ve looked at different methods, let’s compare them to the straw method.
The straw + lighter technique (explained earlier in our guide on how to fix frayed laces with a straw) is:
- Super easy
- Requires only a plastic straw and lighter
- Can be done in less than 5 minutes
- Great for emergencies or quick DIY fixes
However:
- The plastic may not hold up as long as heat-shrink tubing
- It may not look as clean as the thread or tubing method
8. Final Thoughts – Fix Your Laces, Save Your Shoes
As you’ve seen, learning how to fix frayed laces with a straw is a simple and effective shoelace ends repair hack. All it takes is a plastic straw, a pair of scissors, and a lighter to restore your worn-out shoelaces in minutes.
This simple DIY hack is affordable, easy for anyone to try, and gives your worn-out shoelaces a second life instead of tossing them away. There’s no need to replace the whole lace when you can easily fix the tip at home.
Tried this hack? Share your experience in the comments below! Let us know how this method worked out for you
Also, don’t forget to explore more tips like how to clean white shoelaces fast and other useful DIY shoelace tricks here.
9.Conclusion
Fixing frayed or broken shoelace tips doesn’t have to be expensive or time-consuming. With this easy shoelace fix using a lighter and straw, you can save your favorite laces in just minutes. This straw trick for shoelaces is not only budget-friendly, but also a fun DIY project anyone can do at home.
Instead of buying new laces, try this cheap way to fix shoelaces—you’ll get strong, smooth aglets that work just like store-bought ones. It’s a clever solution that keeps your shoes looking neat and saves you money too!
10.FAQs
Q1: Can I use a paper straw instead of plastic?
Paper straws are not recommended. They don’t melt or hold shape like plastic straws, so they won’t secure the lace tip properly. Use a plastic straw for best results.
Q2: Will this method work for flat shoelaces?
Yes, this method can work for flat laces. Just use a slightly wider straw and gently press the straw while heating so it wraps tightly around the flat lace.
Q3: How long will the straw aglet last?
A properly made straw aglet can last for weeks or even longer, depending on how often you use the shoes. It’s a great short-term shoelace ends repair hack you can redo anytime.
Q4: Can I color the straw aglet?
Yes! Once the straw has cooled down completely, you can use a permanent marker to match the color of your laces or add your own design.
Q5: What if the straw melts too much or sticks?
If the plastic melts too much or sticks unevenly, don’t worry. Let it cool, trim off the extra plastic, and try again with a fresh straw. With some practice, you can achieve a neat and polished result.